
Revamping your basement can feel like a daunting task. Many homeowners look to make the most of this space, but often find themselves limited by budget constraints. That’s why I created this guide on basement ceiling ideas cheap and easy to install. If you’re eager to enhance your basement without breaking the bank, you’re in the right place.
Whether you’re transforming your basement into a cozy family room, a vibrant game area, or a stylish home office, the ceiling plays a crucial role in setting the mood. If you love DIY projects and are on the hunt for budget-friendly ceiling designs, you’ll find inspiration here. I’ve gathered 17 creative and affordable solutions that will not only elevate the space but also keep your wallet happy.
In this post, you’ll discover DIY basement ceiling solutions that are both simple and visually appealing. From painted ceiling beams to fabric draping, you’ll find a variety of styles that suit different tastes and preferences. Get ready to explore easy-to-install ceiling treatments that will transform your basement into a welcoming oasis.
Key Takeaways
– Discover affordable basement ceiling options that fit any style and budget, making it easy to refresh your space.
– Explore creative ideas like reclaimed wood panels and fabric ceiling draping that add character without high costs.
– Learn about easy-to-install ceiling treatments such as acoustic ceiling tiles or drop ceiling tiles that can be done over a weekend.
– Find solutions like exposed ceiling pipes that not only save money but also create an industrial chic vibe.
– Get tips on how to implement budget-friendly ceiling designs that enhance the overall aesthetic of your basement while being practical.
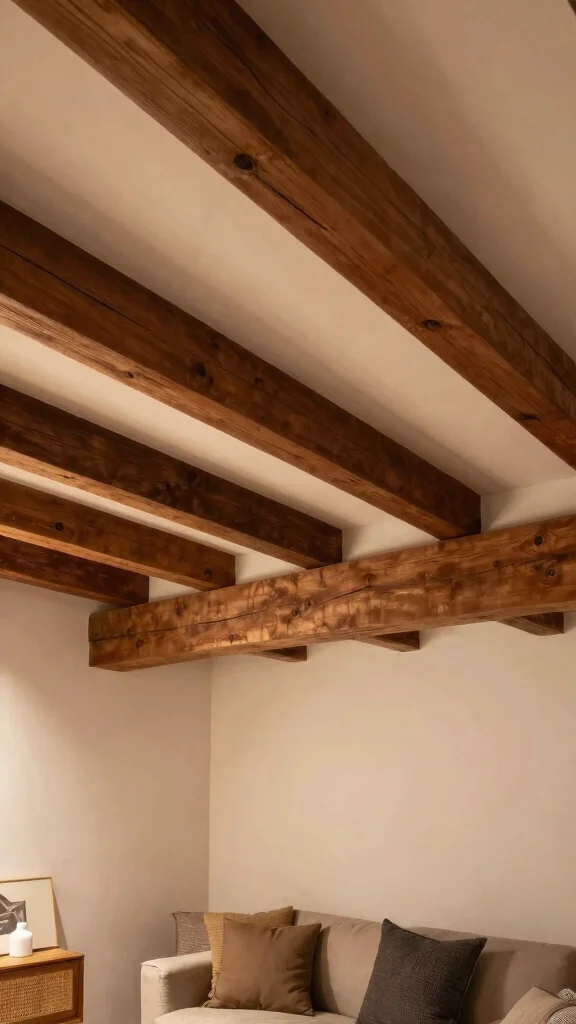
1. Painted Ceiling Beams
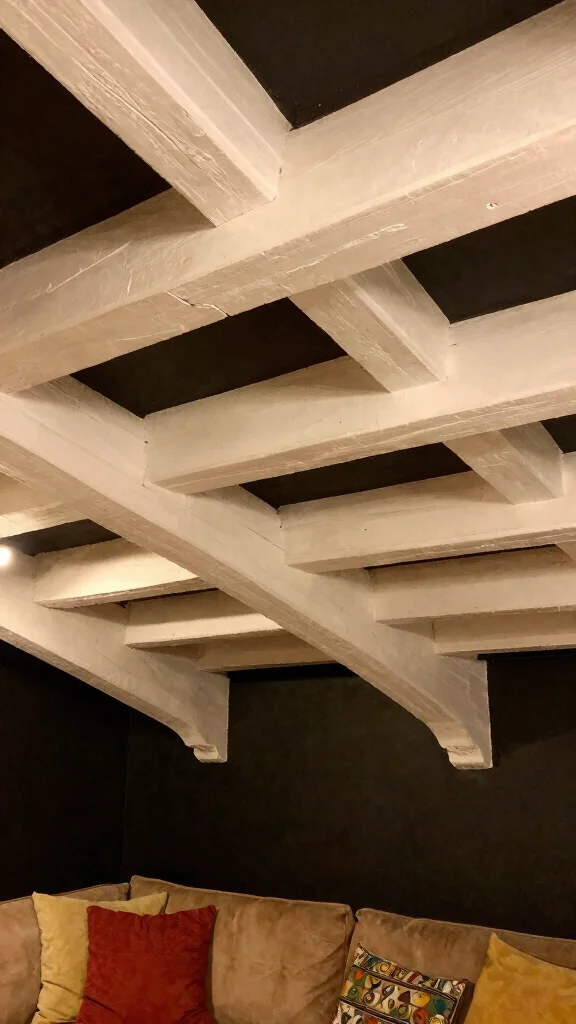
When you refresh your wooden ceiling beams with paint, you instantly transform your basement’s vibe. Choosing light shades like white or soft pastels can open up the space, while vibrant colors add a bold flair that captures attention. Imagine how a crisp white can bounce light around, making the space feel larger and more inviting.
For a successful application, opt for high-quality ceiling paint that adheres well to wood. If you lean towards a dramatic color, test a small patch first to ensure it harmonizes with your existing decor.
Consider these steps for stunning painted beams:
– Clean the beams thoroughly before painting
– Tape off areas you don’t want to color
– Apply a primer for better adhesion
– Paint using a roller for a smooth finish
– Let it dry completely before removing tape
This approach not only enhances visual appeal but also emphasizes the texture of the wood, creating a warm atmosphere in your basement.
🏡 Transform Your Home Today!
Unlock your creativity with our DIY guide and elevate your basement decor on a budget effortlessly.
2. Acoustic Ceiling Tiles

Acoustic ceiling tiles are a clever solution for minimizing noise while adding style to your basement. With a variety of designs and colors, you can tailor these tiles to fit your aesthetic perfectly. They work beautifully in areas where sound absorption is crucial, like a family room or media space.
These tiles are not only budget-friendly but also easy to install, often fitting right over existing ceilings. If you’re seeking a more polished look, consider framing them out to enhance structure and design.
Here’s how to install acoustic tiles:
– Measure the ceiling space accurately
– Choose tiles that resonate with your style
– Gather tools like adhesive and a utility knife
– Install tiles in a grid pattern for uniformity
– Ensure they’re level for a professional finish
By selecting the right tiles, you can enhance both sound quality and design, creating a cozy, inviting space.
3. Fabric Ceiling Draping

Draping fabric across your ceiling is a creative way to introduce warmth and softness to your basement. This technique can transform a stark ceiling into an inviting retreat, perfect for relaxation or entertainment. Imagine airy sheers or textured linens cascading down, adding a cozy touch to your space.
This approach is especially great for creating intimate areas, and it can be done on a budget with lightweight materials. Experiment with colors and patterns that complement your existing decor to achieve a personalized look.
Follow these steps for draping fabric:
– Select a lightweight fabric like sheer or linen
– Measure the ceiling area for accurate coverage
– Attach hooks or adhesive strips for support
– Drape the fabric naturally across the ceiling
– Secure it to the walls for added stability
This method enhances the overall aesthetic, creating a harmonious blend of textures that invites relaxation.
4. Reclaimed Wood Panels

Incorporating reclaimed wood panels into your basement ceiling adds rustic charm and character. Not only are they eco-friendly, but they often come at little or no cost from local sources, making them a smart choice for budget-conscious homeowners. Picture the warm, natural beauty of weathered wood enhancing your space.
This project can be completed in a weekend, providing a satisfying DIY experience. Plus, it contributes to sustainability by reusing materials, giving your basement a unique, earthy vibe.
Here’s how to install reclaimed wood panels:
– Source reclaimed wood from barns or pallets
– Clean and sand the planks for a smooth finish
– Decide on vertical or horizontal layout
– Use adhesive or nails to secure the panels
– Finish with a sealant for protection
This addition not only elevates the aesthetic but also brings nature indoors, enriching your living space.
Difficulty Rating & Requirements
Overall Difficulty Rating: Medium
These basement ceiling ideas are generally easy to moderate in difficulty. Most of these projects are suitable for homeowners with basic DIY skills. If you can handle a paintbrush and use basic tools, you’ll feel right at home with these options. However, some ideas may require a bit more effort, especially when working with heavier materials like reclaimed wood or tin tiles.
Time Estimate:
⏱ Estimated time: 2-5 days
– Planning and Preparation: 1 day to choose materials and gather tools.
– Installation: 1-3 days depending on the selected ceiling treatment.
– Finishing Touches: 1 day for paint, caulking, and cleanup.
Skill Requirements:
– Required skills: Basic carpentry, painting, and measuring skills.
– Beginner-friendly: Yes. Most tasks can be tackled by someone with minimal experience, especially with a helpful tutorial.
– Skills that can be learned: Painting, hanging tiles, and simple carpentry tasks. Skills requiring experience include working with electrical fixtures if you plan to add lighting.
Tools & Materials Needed:
🧰 Essential items checklist:
– Paintbrushes/Rollers: Required for painting options.
– Level: Required for ensuring straight lines, essential for drop ceilings.
– Tape Measure: Required for accurate measurements.
– Hammer and Nails: Required for wood or fabric treatments.
– Utility Knife: Required for cutting tiles or fabric.
– Safety Goggles: Required for protection during installation, especially with power tools.
– Drop Cloths: Optional to protect floors during painting or installation.
– Lighting Fixtures: Optional for enhancing the aesthetic appeal with string lights or other designs.
Step-by-Step Overview:
1. Planning and Design (1 day): Choose your ceiling style and gather materials. Research how-to guides for your selected option.
2. Preparation (1 day): Clear the basement area and prepare the ceiling surface. Make repairs if necessary.
3. Installation (1-3 days): Follow the specific instructions for your chosen ceiling treatment. This phase may involve painting, hanging tiles, or installing wood panels.
4. Finishing Touches (1 day): Apply any final coats of paint, clean up debris, and add lighting if desired.
Professional vs DIY: Rough cost comparison and when to hire help.
– Professional Installation: Hiring a contractor can cost anywhere from $1,000 to $5,000 depending on the complexity and materials used. This usually includes labor and high-quality materials.
– DIY Costs: You could complete a project for as little as $100 to $800, depending on materials like fabric, paint, or tiles. If you have basic tools, this can be even more affordable.
If you’re uncertain about your skills or if the project involves complex electrical work, hiring a professional may be the best choice. For simpler designs, go ahead and give it a shot yourself!
5. Directly Painted Ceiling

A fresh coat of paint on your ceiling can work wonders in transforming your basement. Lighter colors can create an illusion of height and openness, making the room feel more expansive. Envision how a soft sky blue can reflect light and brighten up the space.
This straightforward method requires minimal materials and effort, making it a quick weekend project. Choose a color that complements your decor for cohesive design.
Here’s how to paint your ceiling:
– Select a light color suitable for ceilings
– Tape edges where ceiling meets walls
– Use a roller for smooth application
– Apply multiple coats for full coverage
– Carefully remove tape after drying
This simple update enhances the overall ambiance, creating a fresh, inviting environment in your basement.
6. Wallpapered Ceiling
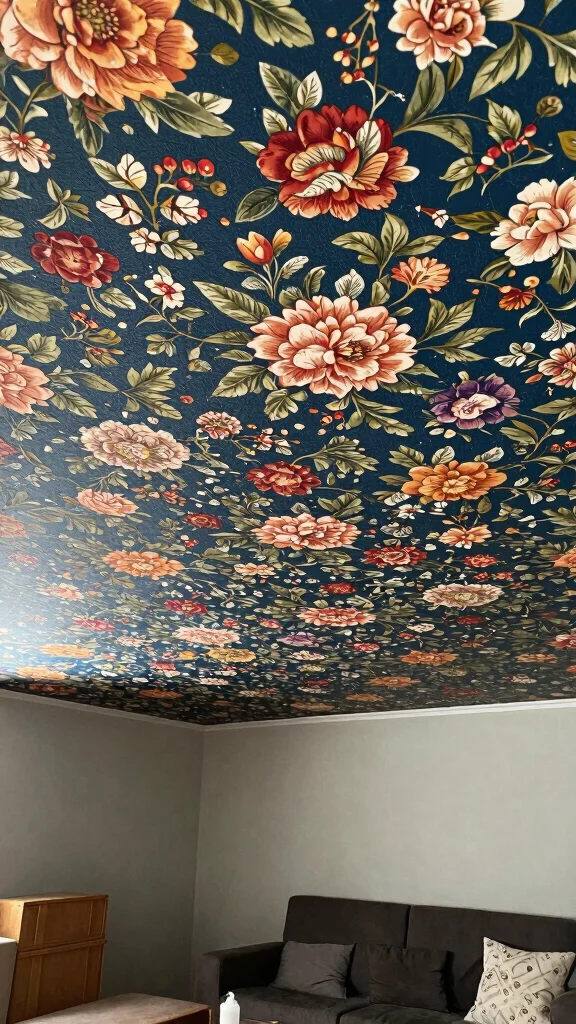
Wallpapering your ceiling is a bold and imaginative way to make a statement in your basement. This unique approach allows you to showcase your personality with endless designs and patterns. Picture a floral print or geometric design adding visual interest overhead.
Not only is this a fun project, but it also personalizes your space in a way that traditional paint cannot. Choose a design that complements your overall theme for a cohesive look.
Consider these steps for wallpapering your ceiling:
– Select a wallpaper that fits your style
– Measure the ceiling accurately before cutting
– Apply paste as directed for best results
– Carefully place wallpaper, smoothing out bubbles
– Trim excess edges for a polished finish
This dynamic update turns the ceiling into a stunning focal point, enriching the overall decor.
Wallpapered ceilings are a bold move, but they’re also a cheap, high-impact way to transform a basement into a design feature. Pick a pattern that speaks to you, then let the ceiling do the talking. Before you know it, the space feels taller, brighter, and uniquely yours.
7. Drop Ceiling Tiles
Drop ceilings offer a practical and stylish solution for concealing plumbing and electrical work in your basement. These tiles not only enhance the aesthetic but also make repairs easier in the future. Imagine a clean, finished look that complements your space while providing functionality.
They come in various styles and colors, allowing you to customize according to your taste. This accessibility makes them a popular choice for homeowners looking to improve their space.
Here’s how to install drop ceiling tiles:
– Measure your ceiling area for accurate dimensions
– Purchase the necessary kits and tiles
– Follow instructions to install the framework
– Drop tiles into place for a seamless look
This solution not only beautifies your basement but also provides a practical way to manage maintenance, enhancing your overall experience.
Fun fact: Drop ceiling tiles come in 2×2 ft or 2×4 ft sizes, so a grid of 10–12 tiles can transform a basement in just 1 weekend. You’ll hide pipes and wiring and swap in colors to match your style.
You might also like


8. Exposed Ceiling Pipes
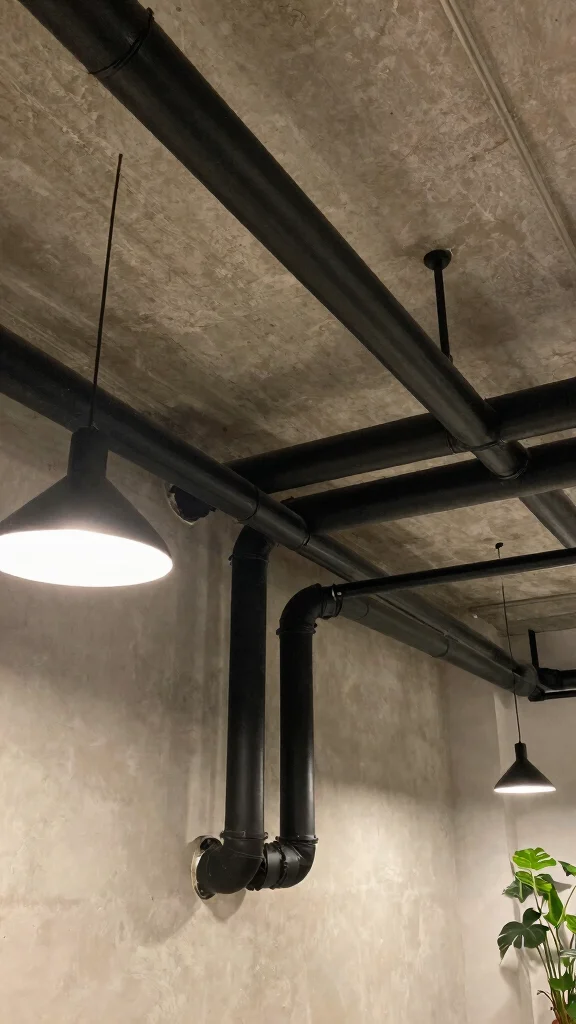
Exposing ceiling pipes can introduce an industrial chic vibe to your basement, creating a striking visual feature. This method is cost-effective since it requires minimal additional materials, and it gives your space a unique character. Imagine the contrast of rugged pipes against a soft ceiling treatment, adding depth and interest.
By leaving the pipes visible, you embrace a trend that celebrates raw materials and authenticity. This approach can also be enhanced with decorative elements like string lights or plants.
Follow these steps for exposing pipes:
– Clean the pipes thoroughly for a polished look
– Consider painting them for added contrast
– Keep surrounding areas minimal to highlight the pipes
– Add decorative touches like lights or greenery
This method not only modernizes your basement but also transforms the industrial elements into conversation starters.
Fun fact: Exposed ceiling pipes can slash basement ceiling ideas cheap projects by up to 40%—no pricey drywall or textures needed. Embrace the industrial chic, then finish with a simple ceiling treatment for contrast and character.
9. Ceiling Medallions
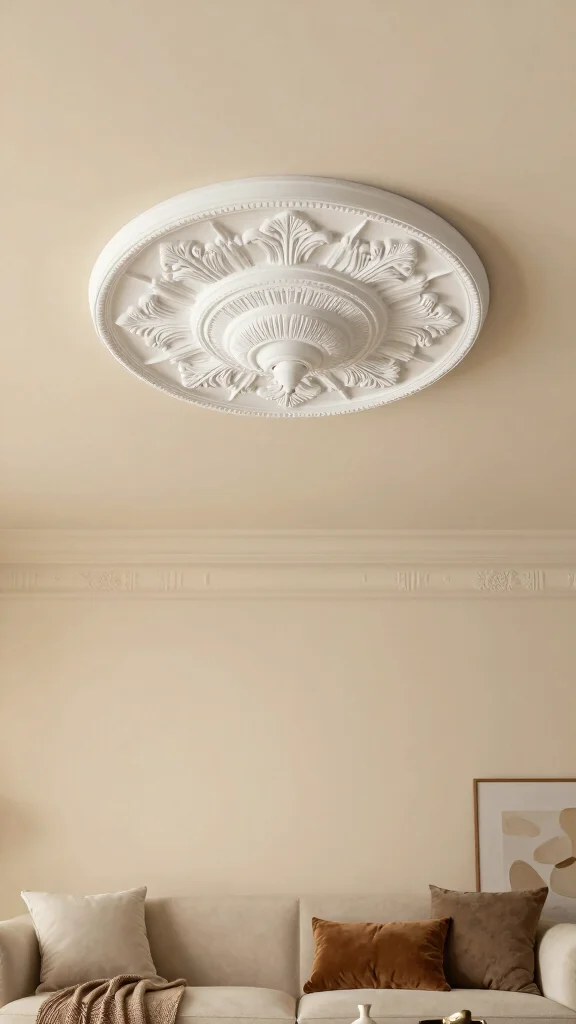
Incorporating ceiling medallions can instantly elevate your basement’s aesthetic without straining your budget. These decorative pieces add a classic touch, especially when painted to match your decor. Think of how a beautifully crafted medallion can draw the eye and enhance the overall elegance of the room.
They are lightweight and easy to install, making them a great DIY project. Pairing a medallion with an attractive light fixture can create a stunning focal point.
Here’s how to install ceiling medallions:
– Choose a medallion style that fits your space
– Clean the area where it will be placed
– Apply adhesive to the medallion
– Press it firmly in place, ensuring it’s level
– Paint for a cohesive look if desired
This touch adds sophistication and charm, enriching the visual experience of your basement.
10. Tin Ceiling Tiles
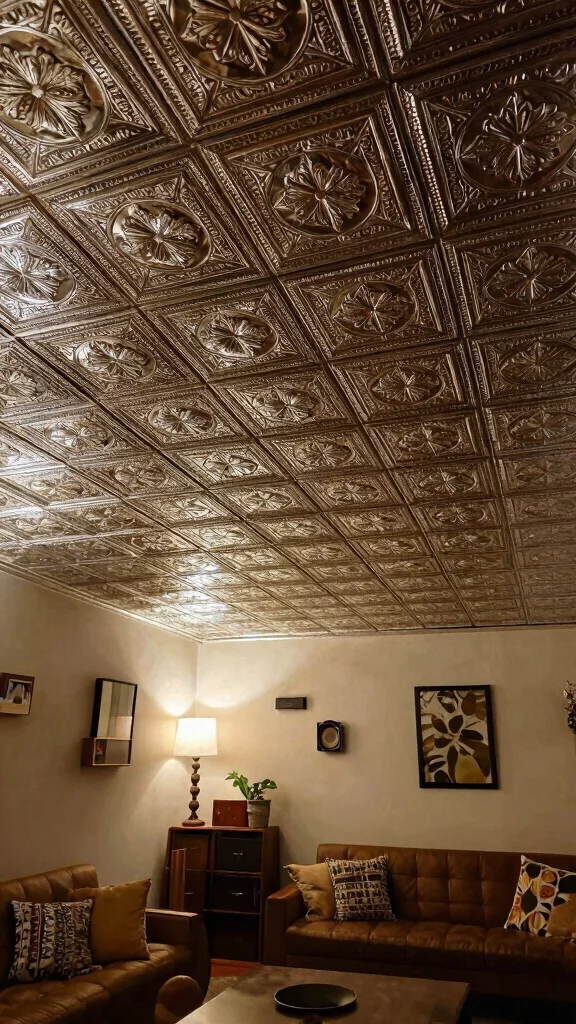
Opting for tin ceiling tiles brings a vintage-inspired charm to your basement. These tiles are not only sophisticated but also relatively affordable, allowing for creative expression. Picture how metallic colors can reflect light and create a luxurious atmosphere in your space.
They can be painted to match your theme, providing a versatile and stylish ceiling option. This project allows for a delightful blend of history and modern design.
Here’s how to install tin ceiling tiles:
– Purchase tiles designed for ceilings
– Use adhesive or nails for secure placement
– Overlap tiles for a seamless appearance
– Add a coat of paint if desired for personalization
This addition enhances the character of your basement, creating a memorable setting that invites admiration.
11. Cork Ceilings
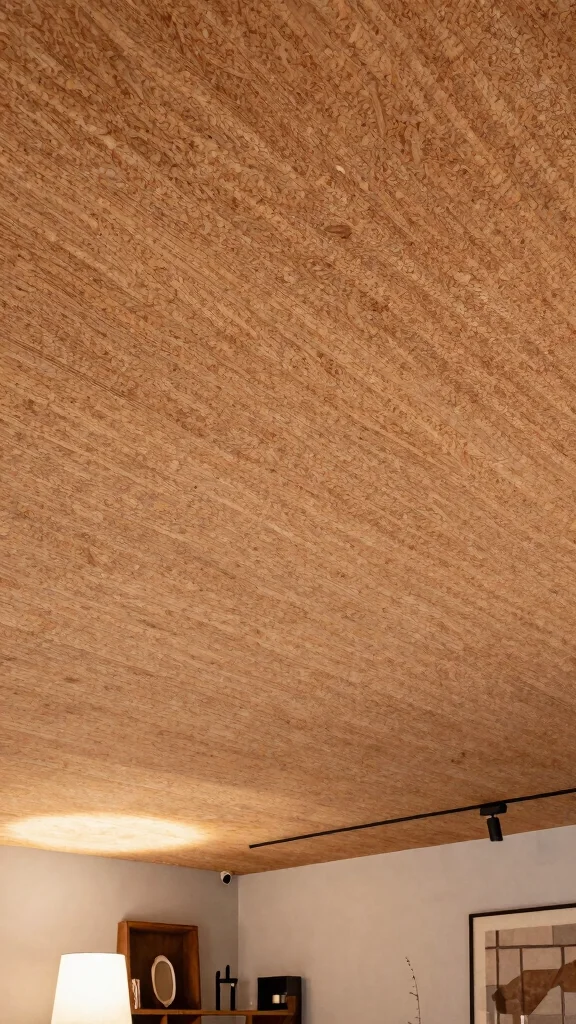
Cork ceilings offer a stylish and eco-friendly option that is both functional and aesthetically pleasing. They provide excellent insulation and soundproofing while being simple to install. Imagine how the natural texture of cork can warm up your basement and create a cozy ambiance.
These panels are lightweight, making them suitable for DIY projects, and they can be sealed for durability. You can leave them natural for a rustic look or paint them for a personalized touch.
Consider these steps for installing cork ceilings:
– Install cork sheets or tiles directly onto the ceiling
– Use adhesive for secure placement
– Seal with a protective finish for longevity
This practical choice enhances both comfort and style, making your basement a more enjoyable space.
12. Stenciled Ceilings
Stenciling your ceiling is a creative way to add distinctive flair and personality to your basement. This budget-friendly project allows you to express your style through unique designs and patterns. Imagine a delicate floral or bold geometric pattern bringing life to an otherwise plain ceiling.
It’s a fun way to showcase your creativity while enhancing the overall ambiance of the space. Choose a design that fits your personality and complements your decor.
Follow these steps for stenciling your ceiling:
– Choose or create a stencil that suits your style
– Paint the ceiling in a base color of your choice
– Secure the stencil and apply paint with a sponge or brush
– Carefully remove the stencil and let it dry
– Touch up edges as needed
This method transforms your basement into a personalized haven, celebrating your artistic side.
13. Faux Ceiling Beams
Faux ceiling beams add depth and dimension to your basement without the expense of real wood. These lightweight alternatives are easy to install, making them a favorite among DIY enthusiasts. Picture the contrast of dark faux beams against a light ceiling, creating a striking visual effect.
This option allows you to achieve the look of real wood while being budget-friendly. They can be painted or stained to match your decor for a cohesive appearance.
Here’s how to install faux beams:
– Purchase lightweight faux beams in your preferred style
– Measure your ceiling for proper placement
– Secure beams with adhesive or nails
– Paint or stain to achieve your desired finish
This design choice enhances the overall aesthetic, adding an inviting feel to your basement.
You Might Also Like


14. String Lights as a Ceiling Feature
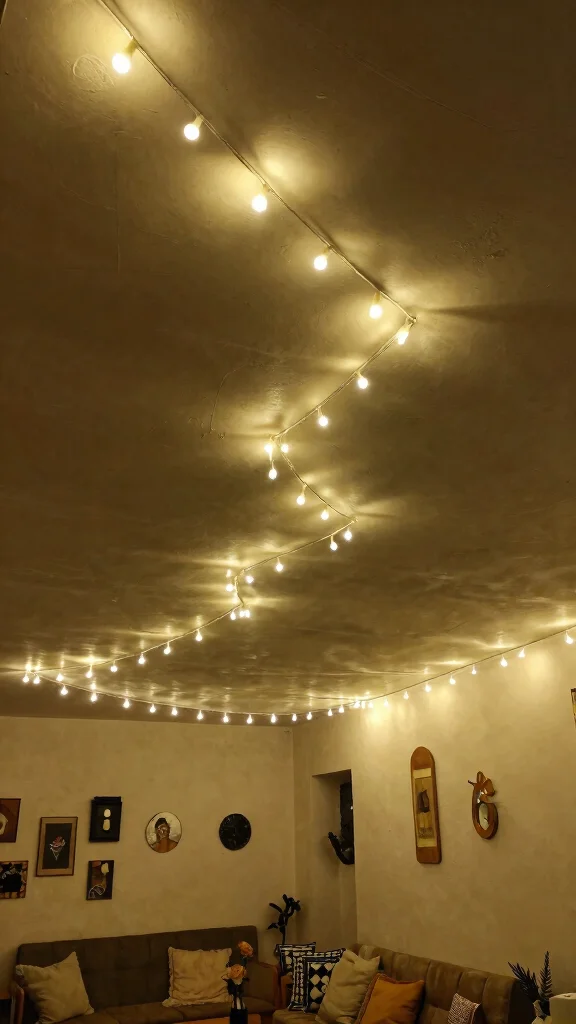
Using string lights creatively can transform your basement ceiling into a captivating display. This budget-friendly method adds a whimsical touch, perfect for creating a cozy atmosphere. Imagine the soft glow of warm lights illuminating your space, inviting relaxation and enjoyment.
This project is simple and allows for various layouts, whether zigzagging across the ceiling or forming a starburst pattern. Choose colors that match your desired ambiance for an added touch.
Consider these steps for string lights:
– Decide on a layout that suits your style
– Use adhesive hooks or removable tape to secure lights
– Ensure even spacing for a polished look
– Plug them in and enjoy the ambiance
This addition not only enhances the design but also creates an enchanting atmosphere, perfect for gatherings or quiet evenings.
15. PVC Ceiling Panels
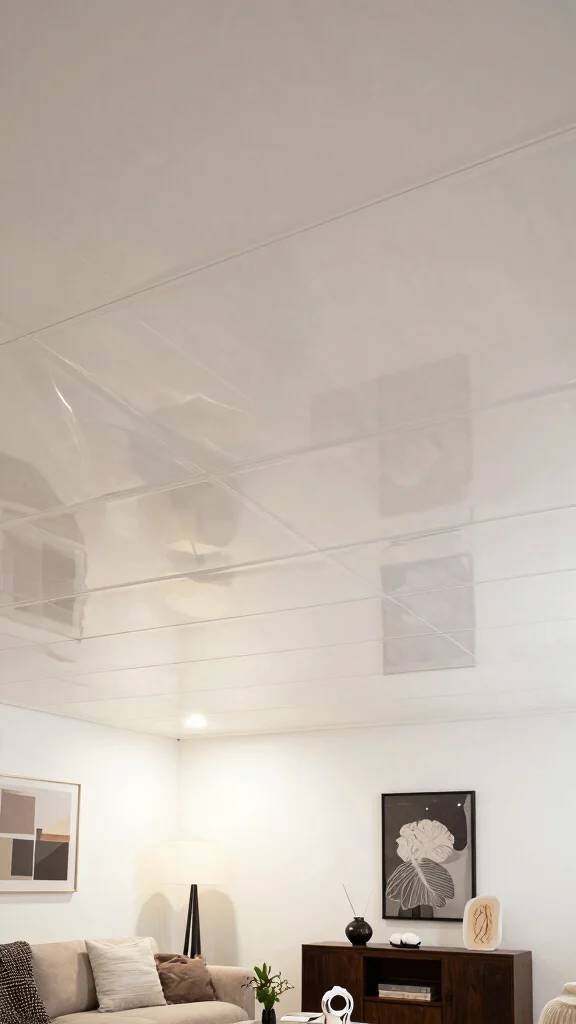
PVC ceiling panels provide a modern and moisture-resistant solution, perfect for basements. These lightweight panels are not only affordable but also easy to install, making them ideal for DIY projects. Picture how sleek, white panels can brighten up your space and create a clean look.
They come in various styles and colors, allowing for customization that fits your personal taste. This option combines functionality with a contemporary design aesthetic.
Here’s how to install PVC ceiling panels:
– Measure the area accurately for paneling
– Purchase panels in your chosen style and color
– Cut panels as needed for a perfect fit
– Secure them using adhesive or nails
This practical choice enhances your basement’s appearance while ensuring durability and ease of maintenance.
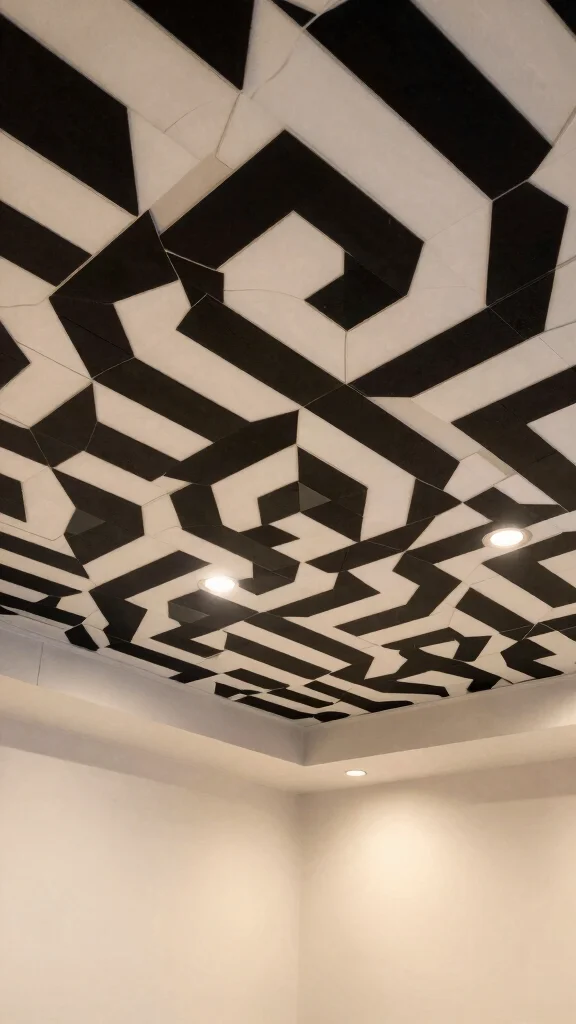
16. Decorative Ceiling Grids
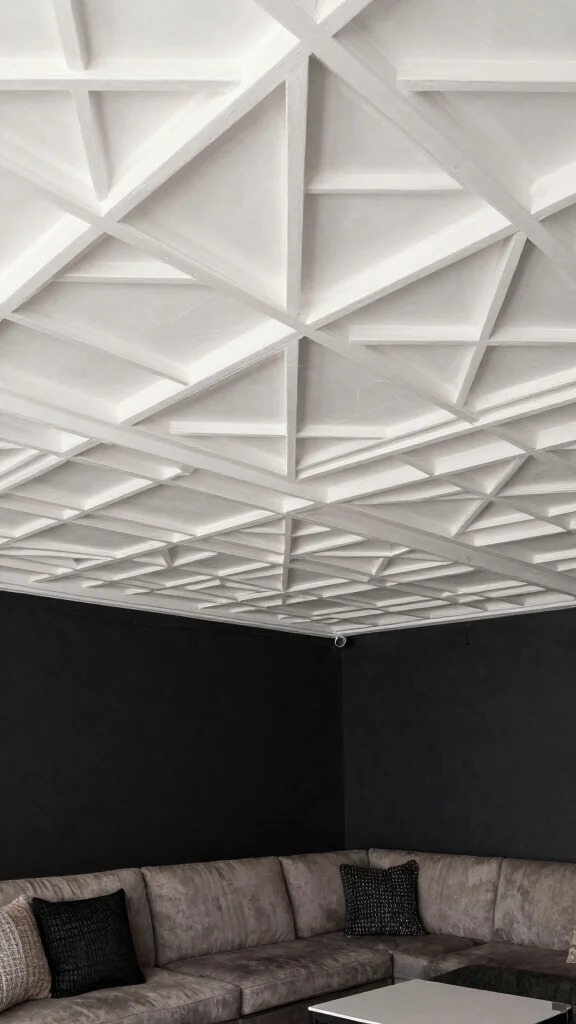
Installing decorative ceiling grids adds clean lines and elegance to your basement ceiling. This budget-friendly option not only covers imperfections but also creates visual interest. Imagine how a grid pattern can transform a plain ceiling into an eye-catching feature.
This approach allows for easy installation and customization, making it an appealing choice for many homeowners. Pairing grids with textured materials can enhance the overall design.
Here’s how to install decorative ceiling grids:
– Measure your ceiling to determine grid quantities
– Install a framework based on your design
– Attach grid pieces securely
– Paint them to match or contrast with your ceiling
This addition brings sophistication and charm, enriching the aesthetic of your basement.
17. Mural Ceiling

For those with an artistic flair, painting a mural on your ceiling can be a breathtaking enhancement to your basement. This unique option allows your space to reflect your creativity and personal style. Imagine a vibrant landscape or whimsical design capturing attention and sparking conversation.
This project can be as simple or complex as you desire, making it a rewarding experience. Consider starting with a smaller area if you’re new to mural painting to build confidence.
Here’s how to create a mural ceiling:
– Decide on a theme or design for your mural
– Sketch the design directly or use projectors for precision
– Select suitable paint and brushes for ceiling work
– Paint the mural, allowing drying time between colors
– Seal with a protective finish if desired
This artistic touch transforms your basement into a personalized haven, celebrating your unique style.
Conclusion

There you have it—17 affordable and easy-to-install basement ceiling ideas that can transform your home without draining your wallet. These creative solutions are perfect for any style, whether you’re going for chic elegance or a rustic charm. With just a bit of effort, you can create a stunning basement that feels like a true extension of your home. So, gather your supplies, unleash your creativity, and enjoy the journey of upgrading your space!
Frequently Asked Questions
What are some basement ceiling ideas cheap that are easy to install?
For a quick, budget-friendly upgrade, try basement ceiling ideas cheap like beadboard panels, PVC plank ceilings, or painted drop ceilings. These options are lightweight, DIY-friendly, and install in a weekend with basic tools. Start by measuring the space, choosing a moisture-resistant material, and following the manufacturer’s instructions. If you need access to plumbing or wiring, consider a drop-ceiling or modular ceiling tiles to hide the mess while keeping access. Finish with a coat of paint to tie it to your decor.
How can I choose affordable basement ceiling options without sacrificing style?
Set a clear budget, assess moisture, and pick options that suit your style. Affordable basement ceiling options include beadboard, PVC planks, or fabric panels for acoustics. Look for a water-resistant finish and consider lighting integration to keep things stylish yet practical. A quick mockup or sample board helps ensure you love the budget-friendly ceiling designs before you commit.
Which DIY basement ceiling solutions are easiest for a beginner to install?
Start with DIY basement ceiling solutions that require minimal framing or no framing at all: PVC plank ceilings, beadboard, or fabric-covered panels. Gather basic tools, prep the surface, cut to size, and install with adhesive or simple fasteners. Paint or finish to taste, and you’ll have a refreshed look in hours, not days.
Are there budget-friendly ceiling designs that hide ducts and pipes in a basement?
Absolutely. creative basement ceiling ideas like a suspended tile grid, beadboard with a service cavity, or PVC plank ceilings can hide ductwork and wiring while still looking polished. A drop-ceiling grid gives easy access for maintenance and keeps costs down. Choose moisture-resistant tiles and light colors to brighten the space and feel airy.
What steps should I take to maintain a cheap basement ceiling so it lasts?
First, control moisture and humidity to protect cheap ceilings from warping or mold. Regularly clean surfaces with a mild cleaner, and inspect for leaks or sagging tiles. If you notice damage, replace individual tiles or panels rather than redoing the whole ceiling—this is why maintenance is key for easy-to-install ceiling treatments on a budget.
Related Topics
basement ceiling ideas cheap
affordable ceiling options
DIY basement solutions
budget-friendly designs
creative ceiling treatments
easy installation
beginner friendly
home decor
budget renovations
quick updates
interior styling
space optimization