Ceiling murals can transform the way your space feels. If you’ve been dreaming of a home that stands out or simply want to elevate a small area, you’ll want to explore creative ceiling mural ideas. This post was born out of a passion for home decor and a desire to help you find unique, artistic solutions to give your rooms a fresh new vibe.
If you enjoy home improvement or just love to express your style, this collection is for you. From vibrant landscapes to calming abstracts, these ceiling mural ideas will spark your imagination and allow your personality to shine in every corner of your home. You’ll discover how to make the ceiling the most exciting surface in the room, creating an atmosphere that captivates and delights.
In this article, you will find 14 artistic and eye-catching ceiling mural ideas, along with practical tips on mural painting techniques and creative ceiling decor. Whether you’re tackling a cozy nook or a grand space, these designs will help you create a stunning centerpiece that draws the eye and enhances your home’s charm. Get ready to explore these imaginative designs and transform the way you see your ceilings!
Key Takeaways
– Discover 14 unique ceiling mural ideas that can enhance your home decor, making any room feel more inviting and inspired.
– Learn about different themes, such as nature, abstract, and whimsical designs, that cater to various tastes and styles.
– Explore mural painting techniques that will help you achieve the right artistic look, whether you prefer DIY or hiring a professional.
– Find tips on decorative ceiling murals that make the most of small spaces, turning them into beautiful focal points without overwhelming the room.
– Get practical advice on how to choose colors and designs that suit your overall decor style, ensuring a harmonious look throughout your space.
1. Cloudy Dreams
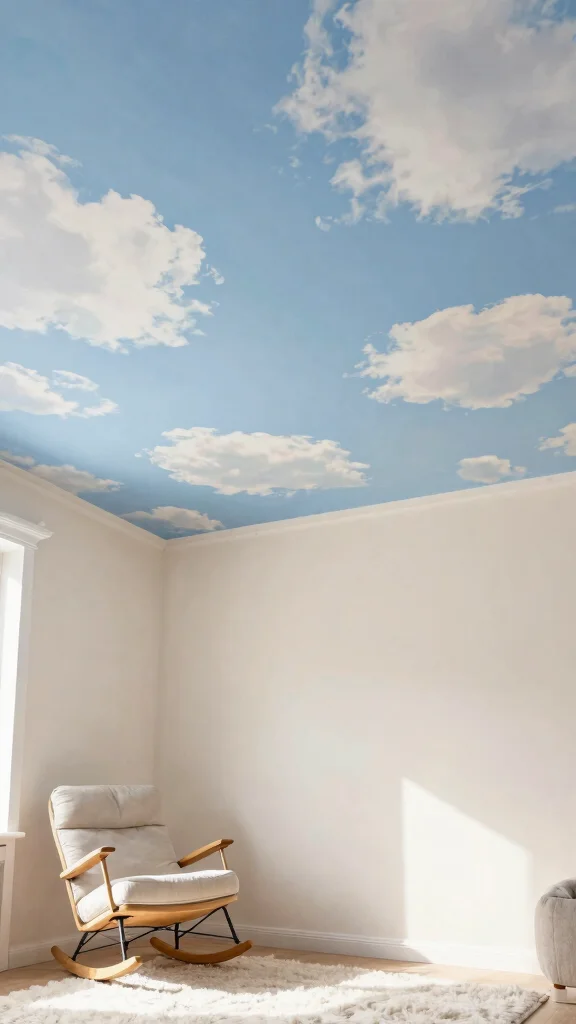
Envision a ceiling mural that captures the essence of a serene sky filled with fluffy clouds, creating an airy ambiance in your room. This dreamy design works wonders for small spaces, bringing in a sense of openness and tranquility. Soft blue hues paired with gentle white accents evoke calmness, making this mural an ideal choice for bedrooms or nurseries. Techniques like blended painting can help you achieve a gradient effect, reminiscent of a natural sky.
To enhance the mural’s charm, consider adding whimsical elements like birds or a radiant sun peeking through. You can also utilize cloud decals to create depth, inviting playfulness and serenity into your environment. Opt for low-VOC paints to ensure a healthier space, especially in areas with limited air circulation.
Consider these ideas to elevate your ceiling mural:
– Incorporate soft blue and white hues for a dreamy effect
– Use blended paint techniques for a gradient sky
– Add whimsical birds or a sun peeking through clouds
– Utilize cloud decals for added dimension
This enchanting design not only beautifies your space but also enhances the overall atmosphere with its soft textures and calming materials.
📹 Related Video: How To Paint Clouds On Your Ceiling
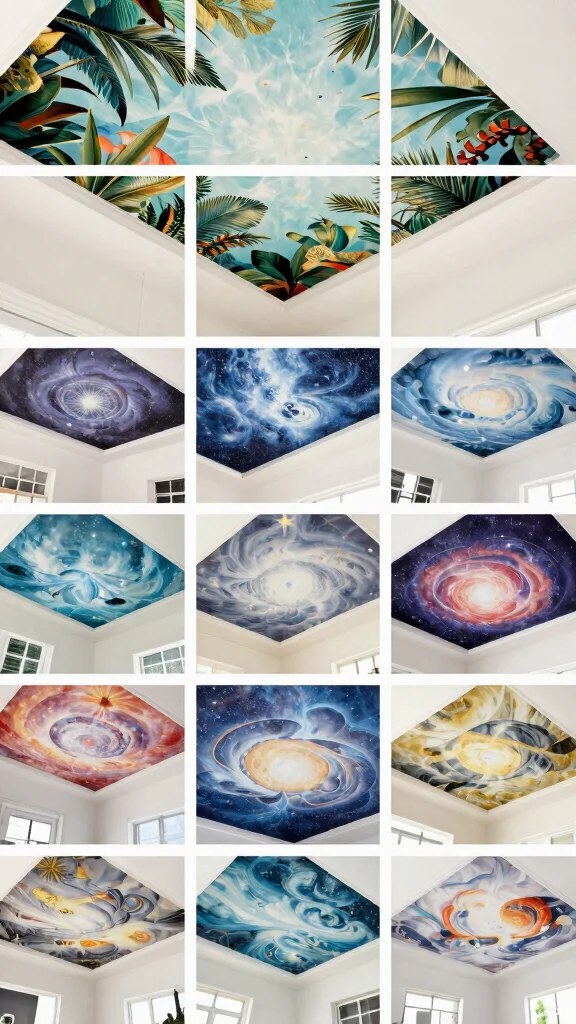
2. Tropical Paradise
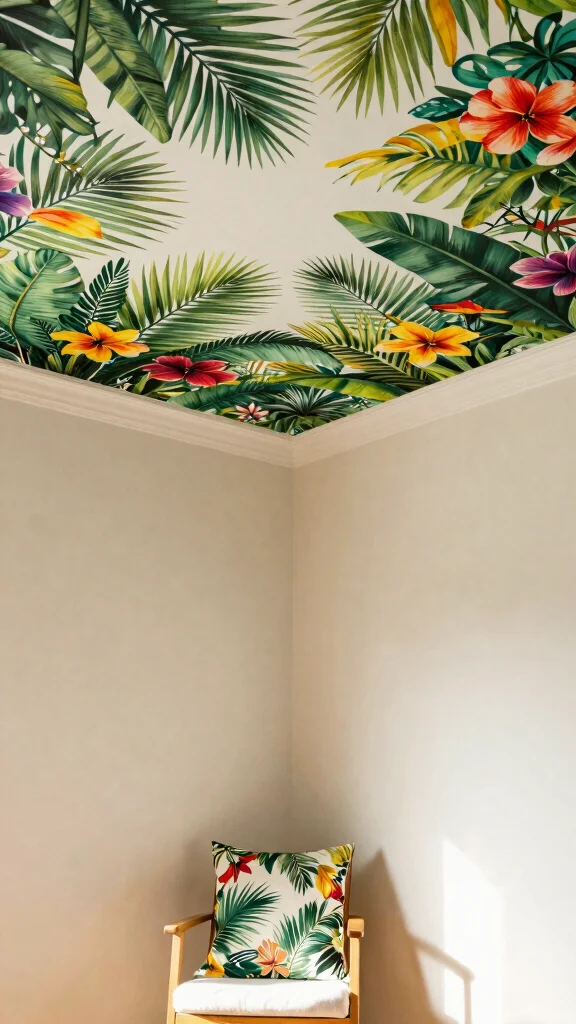
Imagine a ceiling mural that immerses you in a vibrant tropical paradise, filled with lush palm leaves and colorful flowers. This lively design can transform a compact area like a bathroom or reading nook into a joyful escape. Bright greens, yellows, and pinks create an inviting atmosphere, while varied shades of green add depth to the palm leaves. Floral patterns can pop beautifully against the greenery, bringing the tropics right into your home.
Incorporate subtle bird designs, like hummingbirds or parrots, to complete your tropical theme, infusing movement and life into your mural. This lively artwork not only brightens your room but also evokes a vacation-like vibe, making everyday life feel a bit more special. For a budget-friendly approach, use a sponge or brush for a textured look, letting colors blend harmoniously.
Enhance your tropical theme with these tips:
– Paint vibrant palm leaves in multiple shades of green
– Incorporate bold flowers for a lively contrast
– Add subtle bird designs for extra flair
– Use texture techniques with sponges for depth
This cheerful design brings warmth and energy to your space, making the most of beautiful colors and textures.
3. Starry Night
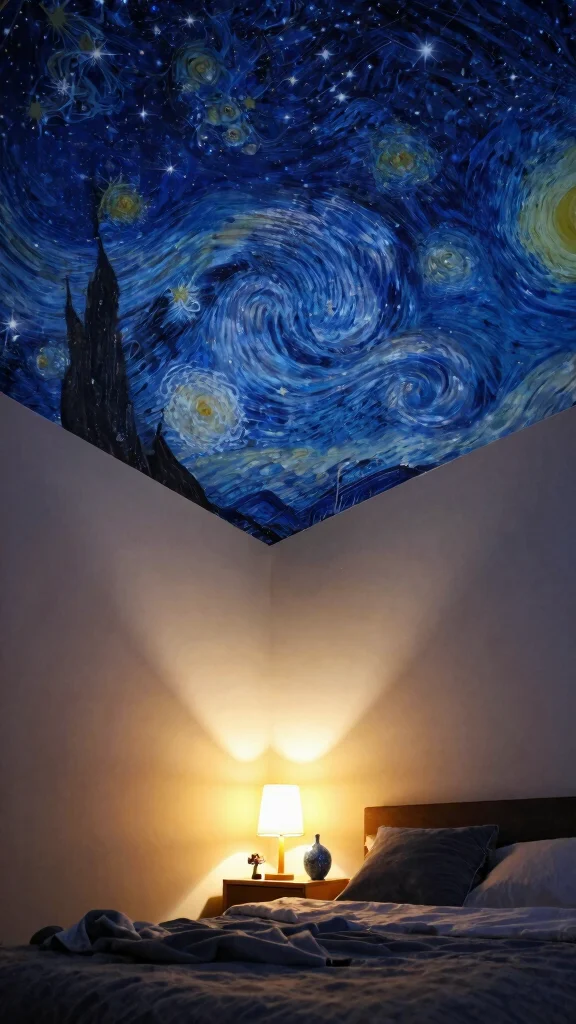
Transform your ceiling into a mesmerizing starry night sky, inviting the wonders of the universe into your room. This enchanting concept is perfect for bedrooms, where you can create a calming, dreamy atmosphere. Deep blues and blacks create a rich backdrop, while white or gold stars of varying sizes add dynamic interest. You might even include a crescent moon or shooting stars to enhance the celestial theme.
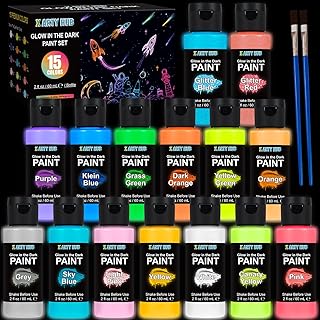
Incorporating glow-in-the-dark paint can add a magical touch, allowing you to gaze at the stars even when the lights are dim. This mural not only creates a sense of wonder but also gives the illusion of a larger space by drawing the eye upward. If painting isn’t your forte, consider using stencils for a uniform star pattern, ensuring a polished finish.
Consider these steps to create your starry mural:
– Use deep blues and blacks for a night sky effect
– Add white and gold stars in varying sizes
– Incorporate a crescent moon or shooting stars
– Use glow-in-the-dark paint for nighttime magic
This celestial design enhances the tranquility of your space while creating a charming atmosphere with its shimmering details.
4. Geometric Precision
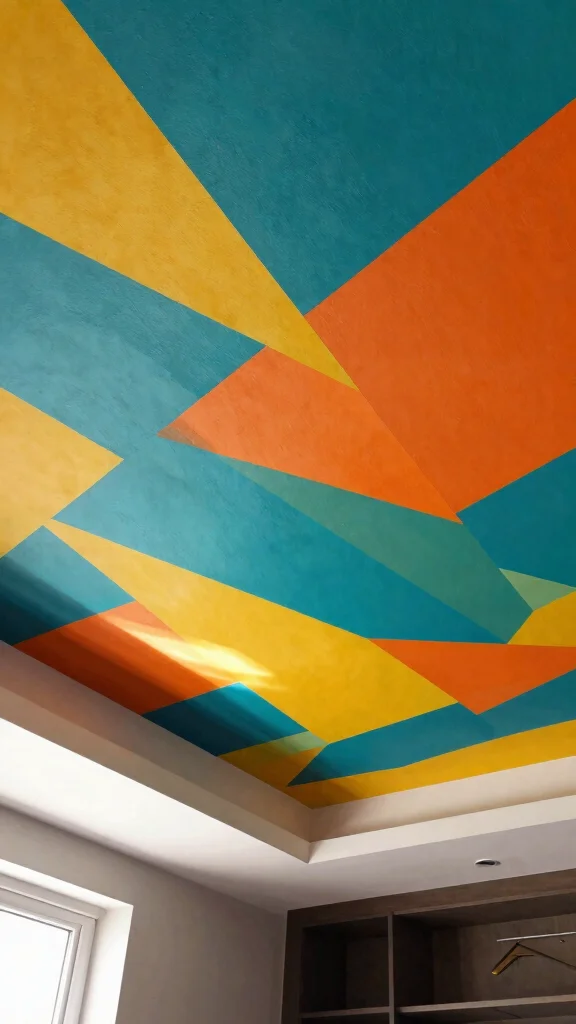
Geometric ceiling murals offer a chic and modern aesthetic, perfect for various spaces in your home. By using bold shapes and colors, you can create a visually striking effect that’s ideal for a contemporary office or trendy living room. Experiment with triangles, hexagons, or abstract forms to add unique flair. Choose colors that complement your existing decor; bright tones can energize a workspace, while softer shades can create a relaxing vibe.
To add depth, consider mixing matte and glossy finishes in your design, creating a play of light and texture that keeps the eye engaged. This approach adds dimension and sophistication to your ceiling. For a clean look, use painter’s tape to achieve sharp lines and distinct shapes, resulting in a professional finish.
Try these techniques to bring geometric designs to life:
– Experiment with triangles and hexagons for unique shapes
– Use contrasting colors to create visual impact
– Mix matte and glossy finishes for texture
– Utilize painter’s tape for clean, sharp lines
This modern design elevates your space, while the interplay of shapes and finishes enhances visual interest.
5. Nature’s Canopy
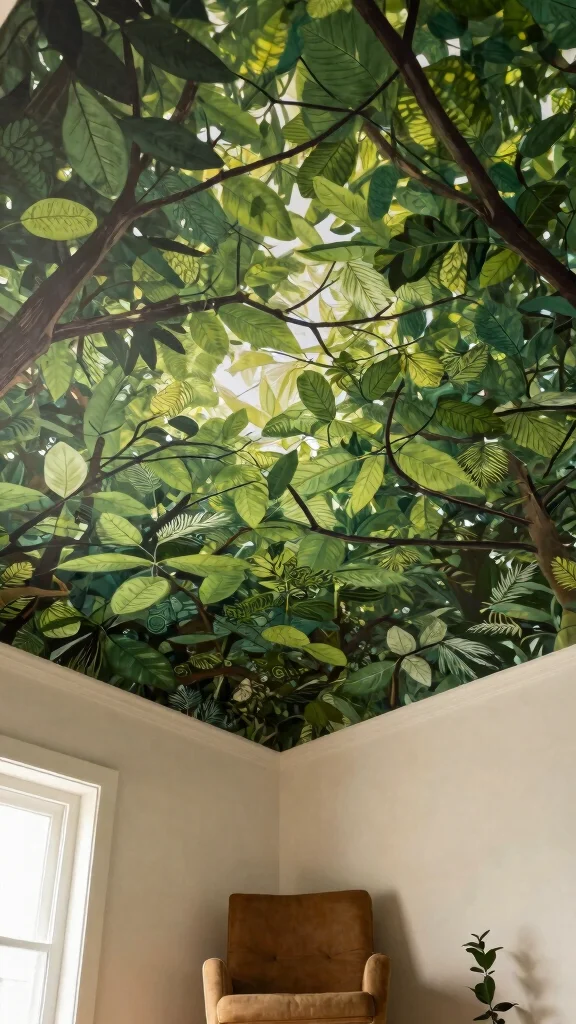
Create a peaceful atmosphere by painting a ceiling mural that mimics a serene forest canopy. This design brings the beauty of nature indoors, ideal for small spaces like meditation corners or cozy reading nooks. Utilize various shades of green and brown to depict leaves and branches, focusing on light and shadow for a realistic touch. Consider adding whimsical elements like birds or butterflies to bring life and vibrancy to your mural.
This enchanting mural not only beautifies your room but also evokes feelings of tranquility and relaxation, making it a perfect environment for unwinding. To enhance the forest theme, incorporate real plants in your space; a small potted plant can seamlessly connect with your mural.
Implement these ideas for a nature-inspired ceiling:
– Use multiple shades of green for leaves and branches
– Focus on light and shadow for depth
– Add whimsical birds or butterflies for liveliness
– Incorporate real plants to enhance the theme
This natural design fosters a serene atmosphere, enriching your space with organic textures and elements.
Nature’s Canopy
Editor’s Choice


Difficulty Rating & Requirements
Overall Difficulty Rating: Medium
Creating a ceiling mural can be challenging but rewarding. It requires attention to detail, artistic skills, and some patience. This project is suitable for those with a basic understanding of painting and some experience in home decor. If you are a creative person who enjoys DIY projects, you’ll likely find it enjoyable, but beginners might face some hurdles.
Time Estimate:
⏱ Estimated time: 3-5 days
Here’s a breakdown of the time for major phases:
1. Planning and Design: 1-2 days to sketch out your ideas and gather materials.
2. Preparation: 1 day for cleaning and priming the ceiling surface.
3. Painting: 1-2 days for the actual mural work, depending on intricacy.
4. Drying and Finishing Touches: 1 day to let everything dry and apply any protective coatings.
Skill Requirements:
– Required skills: Basic painting techniques, color mixing, and some artistic ability.
– Beginner-friendly: No, but with practice, skills can be developed. Some techniques, like brush strokes and shading, may require a bit of experience to master. Beginners can learn on simpler designs before tackling more complex murals.
– Skills that can be learned: Basic painting techniques, color theory, and mural painting techniques. Advanced skills like perspective drawing may require more practice.
Tools & Materials Needed:
🧰 Essential items checklist:
– Acrylic paints (required)
– Paintbrushes in various sizes (required)
– Painter’s tape (required)
– Drop cloths (required)
– Ladder (required)
– Primer (optional, but recommended for better adhesion)
– Protective sealer (optional, for longevity)
– Pencil and paper for sketching out designs (required)
Step-by-Step Overview:
Here’s a brief overview of the main phases with time estimates for each:
1. Planning and Design (1-2 days): Start by brainstorming ideas that fit your space. Sketch your design on paper to visualize how it will look on the ceiling. Choose colors that complement your room’s decor.
2. Preparation (1 day): Clean the ceiling thoroughly to remove dust and debris. If necessary, apply a primer to ensure the paint adheres properly. Use painter’s tape to outline areas you want to keep paint-free.
3. Painting (1-2 days): Begin painting your mural, working from the edges inward. Use different brush sizes for details and larger areas. Take breaks to step back and assess your work from a distance.
4. Drying and Finishing Touches (1 day): Allow the mural to dry completely. Apply a protective sealer if desired to enhance durability. This step is especially important in areas with high humidity, such as bathrooms or kitchens.
Professional vs DIY:
Hiring a professional muralist can cost anywhere from $500 to $2,000, depending on the complexity and size of the mural. This option is great if you’re unsure about your artistic skills or simply want a more intricate design. On the other hand, if you choose the DIY route, you can complete the project for around $100 to $300, depending on materials and tools needed. Weigh your options carefully based on your budget and comfort level with painting.
6. Whimsical Fairytale
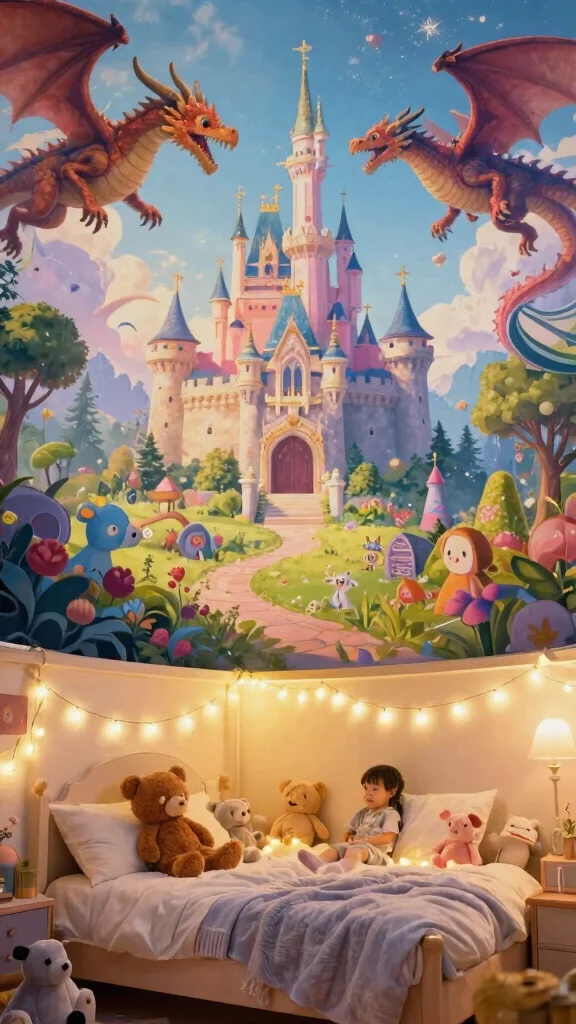
Bring enchantment to your child’s room with a captivating fairytale-themed ceiling mural. Imagine a ceiling adorned with castles, dragons, and magical creatures, transforming bedtime into an adventure. Soft pastels like lavender, pink, and sky blue create a whimsical ambiance, while elements like clouds, shooting stars, and fairy lights add an extra touch of magic. This mural can inspire creativity in children, becoming a cherished part of their imaginative world.
For an interactive twist, consider using glow-in-the-dark paint for stars, helping to soothe your child to sleep with a gentle glow. Involve your child in choosing designs or colors, turning the creation of the mural into a fun bonding activity.
Try these ideas to create a fairytale atmosphere:
– Use soft pastels for a dreamy effect
– Incorporate magical elements like castles and dragons
– Add glow-in-the-dark paint for a soothing touch
– Involve your child in the design process for fun
This whimsical design nurtures imagination and creativity, making bedtime a delightful adventure filled with wonder.
You might also like
7. Vintage Floral

Embrace timeless charm with a vintage floral ceiling mural that infuses classic elegance into any space. This style works beautifully in dining areas or cozy sitting rooms, where a touch of romance is desired. Choose soft, muted flower patterns against creamy or pastel backgrounds for a delicate effect. Mixing different floral designs or incorporating vintage wallpaper patterns can add an extra layer of texture and interest.
This mural creates warmth and nostalgia, inviting comfort and conversation into your home. To enhance its vintage appeal, consider adding antique-style furniture or decor that complements the mural. A satin or matte finish will soften the overall look, avoiding harsh reflections.
Explore these ideas for a vintage-inspired ceiling:
– Select soft, muted floral patterns for a delicate effect
– Mix floral designs with vintage wallpaper for texture
– Add antique-style furniture for cohesive decor
– Use satin or matte finishes to avoid harsh reflections
This nostalgic design brings warmth and charm, enriching your space with timeless beauty.
Vintage floral ceiling mural ideas show that small spaces can bloom with charm. Pair creamy backgrounds with muted florals for instant romance and warmth. Mix patterns thoughtfully to add texture and cozy vibes every day.
Vintage Floral
Editor’s Choice


8. Under the Sea
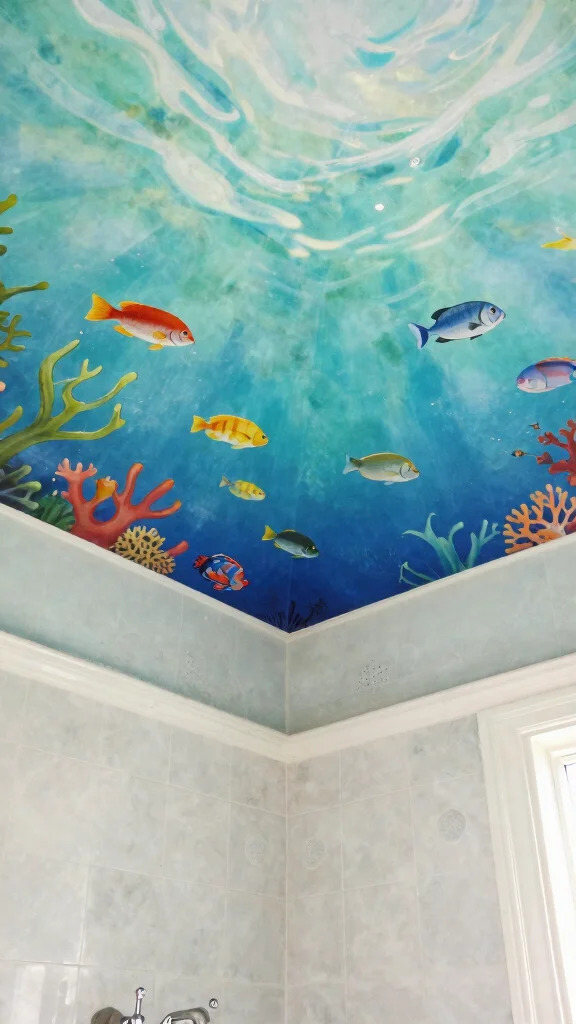
Dive into an underwater adventure with a ceiling mural inspired by the ocean’s beauty. This fun design is especially suited for children’s rooms or bathrooms, where a playful aquatic theme can shine. Paint gentle waves in calming shades of blue, introducing charming sea creatures like dolphins, fish, and starfish for added whimsy. Light shades on the ceiling can mimic sunlight filtering through water, creating a sense of depth and spaciousness.
This mural evokes joy and imagination, making small spaces feel airy and expansive. To enhance the ocean theme, incorporate marine-inspired decor, such as shower curtains or bedding, to create a cohesive and dazzling look.
Use these tips to bring the ocean indoors:
– Paint calming blue waves for a serene effect
– Add whimsical sea creatures for fun
– Use lighter shades to mimic sunlight filtering
– Incorporate marine-themed decor for a cohesive look
This vibrant design creates a joyful atmosphere, blending playful elements with soothing colors for a delightful underwater experience.
Under the Sea
Editor’s Choice


9. Abstract Splash
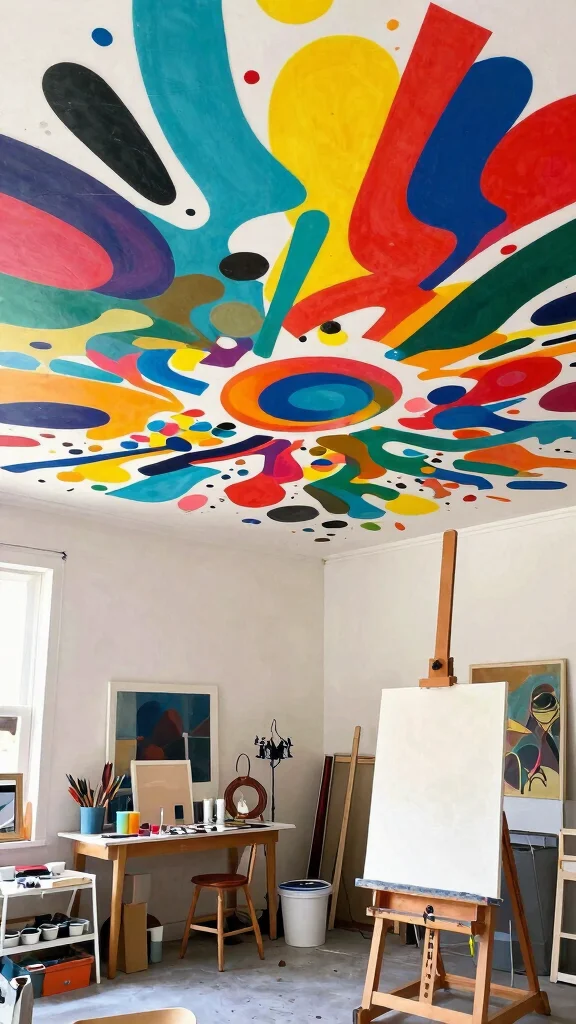
Energize your small space with an abstract ceiling mural bursting with colors and shapes. This dynamic style is especially appealing in creative studios or playful living areas, providing an eye-catching focal point that sparks inspiration. Use bold, contrasting colors for a dramatic effect, or opt for softer, blended hues for a calming ambiance. The essence of an abstract mural lies in creativity—don’t hesitate to let your imagination flow without concern for perfection.
Incorporating various shapes or swirls can add movement and intrigue, making your ceiling feel lively and engaging. For a more organic feel, use a large brush or roller to cover broader areas, allowing colors to blend naturally.
Consider these steps to create your abstract masterpiece:
– Use bold colors for a dramatic visual impact
– Blend softer hues for a calming effect
– Incorporate shapes and swirls for movement
– Use a large brush for a natural blend
This vibrant design infuses energy and creativity into your space, elevating the overall ambiance with its lively colors and textures.
Did you know that bold, abstract ceilings can visually enlarge a compact room by up to 15%? In small spaces, ceiling mural ideas with color bursts and shapes trick the eye—activate energy, define zones, and spark creativity. Start with one focal hue and build from there.
10. Elegant Ombre
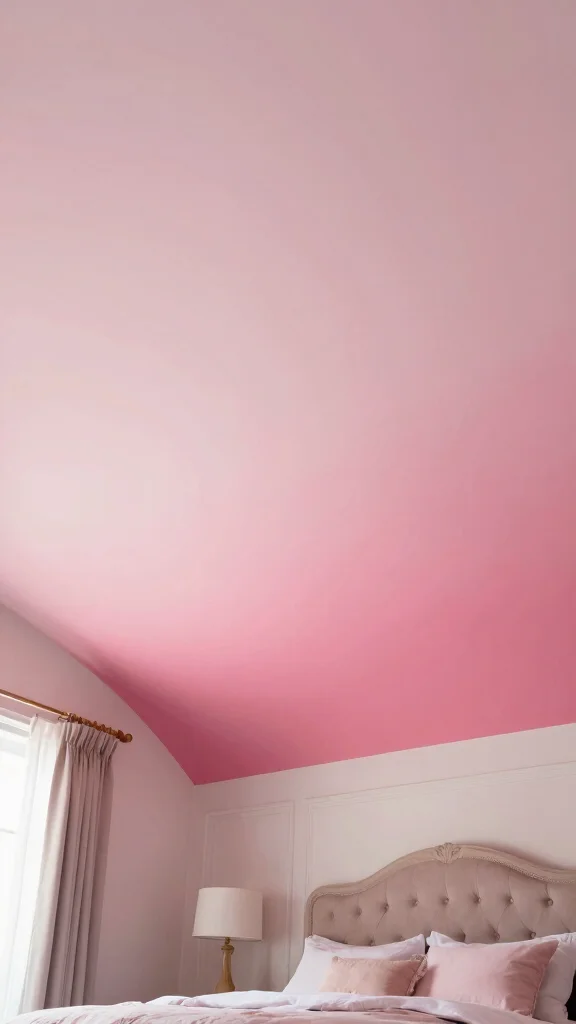
Ombre ceilings offer a chic and simple way to introduce elegance into any small space. This technique blends colors from light to dark, creating a soft gradient that enhances the vertical height of a room. Choose colors that complement your decor; soft pastels can create an airy feel, while deeper shades add drama and intimacy. Ombre ceilings beautifully reflect light, resulting in an ambiance that transforms throughout the day.
This style is perfect for bedrooms, dining areas, or hallways where subtle sophistication is desired. To achieve a smoother transition, a spray gun can be helpful, but a brush can also deliver beautiful results with some practice.
Implement these ideas to create a stunning ombre ceiling:
– Blend colors from light to dark for a gradient effect
– Choose complementary colors to enhance your decor
– Use a spray gun for a smooth finish
– Experiment with a brush for a personal touch
This elegant design enriches your space with a sophisticated atmosphere, drawing attention to its soft gradients and reflective qualities.
Elegant Ombre
Editor’s Choice


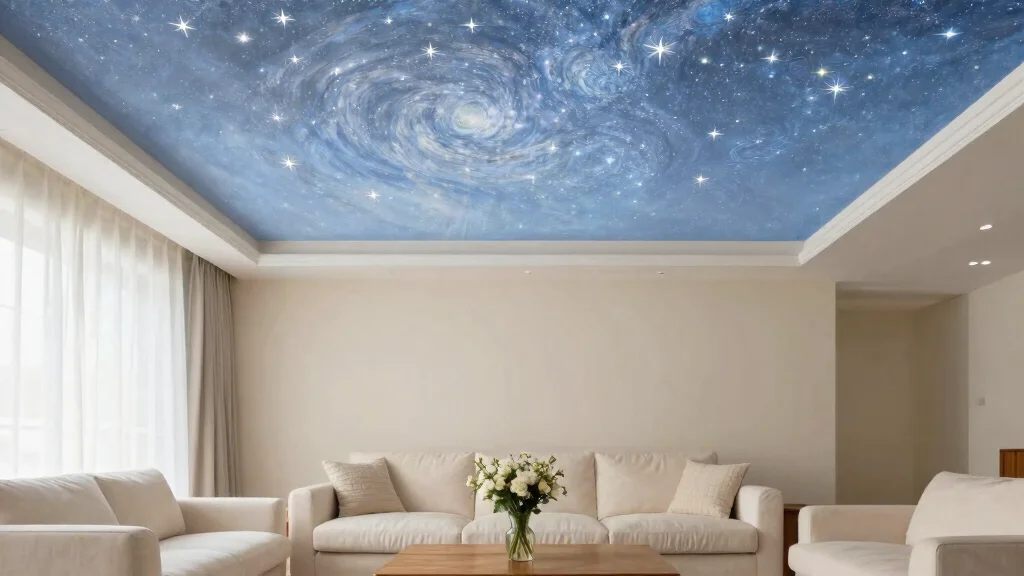
11. Celestial Bodies
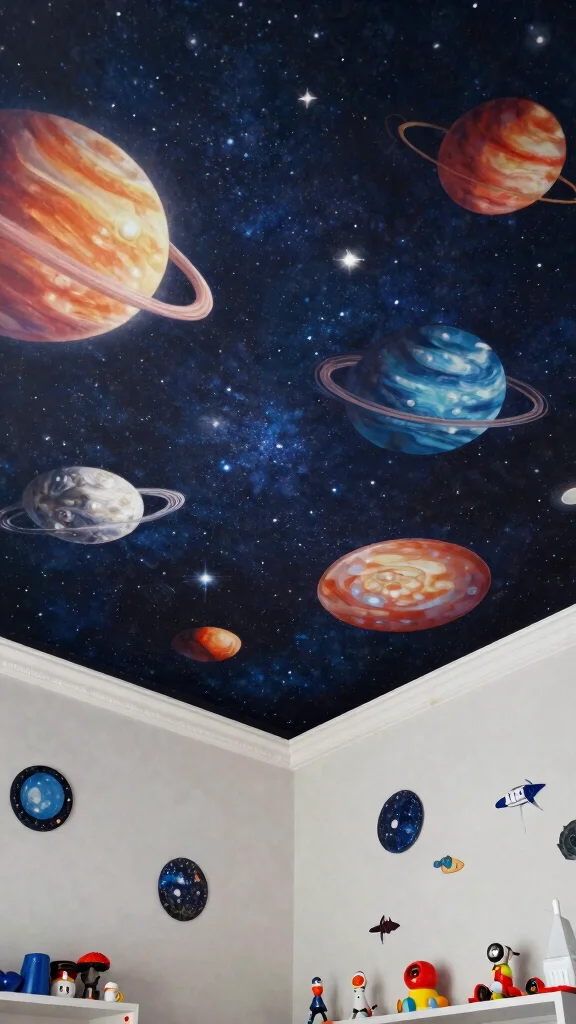
Step into the cosmos with a mural featuring celestial bodies like planets and galaxies. This imaginative design adds a sense of wonder, making it ideal for a child’s room or a themed study. Vibrant colors for planets and stars against a dark backdrop create striking contrast, drawing the eye upward. Adding elements like comets or swirling galaxies can infuse the mural with movement and life.
This design sparks curiosity and imagination, encouraging young minds to dream big and explore the universe. Incorporating glow-in-the-dark paint for select elements can make your mural extra special, allowing stars to shine brightly even in the dark.
Explore these ideas to create your celestial masterpiece:
– Use vibrant colors for planets against a dark background
– Incorporate comets and galaxies for dynamic movement
– Add glow-in-the-dark paint for night-time magic
– Create an imaginative theme that inspires exploration
This cosmic design brings excitement and wonder to your space, enhancing the atmosphere with its enchanting details.
Celestial Bodies
Editor’s Choice


You Might Also Like
12. Simple Stripes
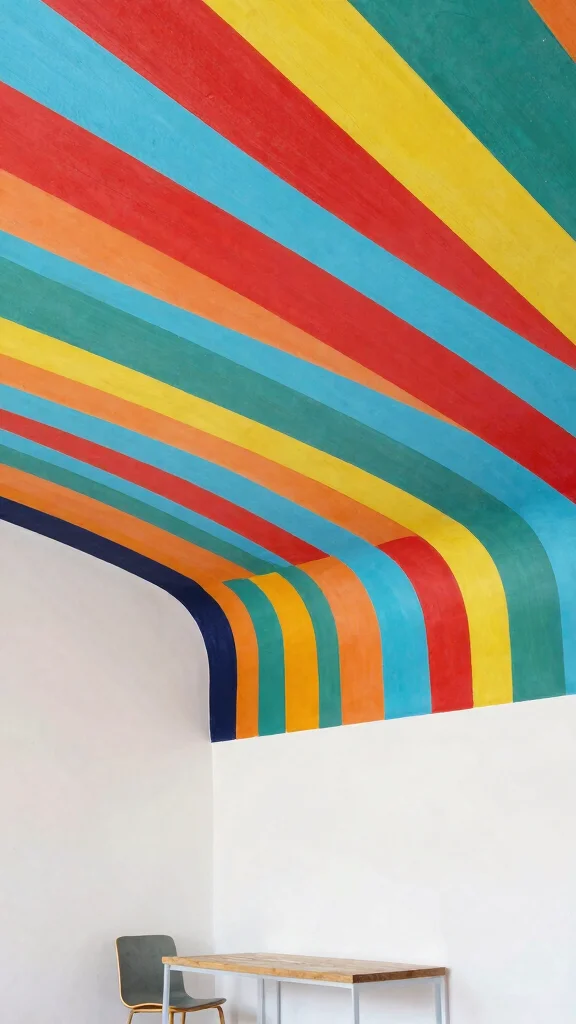
Stripes offer a timeless design element, adding rhythm and movement to a ceiling without overwhelming a small space. Vertical stripes can create the illusion of height, while horizontal stripes can make a room feel wider. Use a variety of colors to match your style; contrasting shades can create a bold statement, while softer tones maintain a subtle look. Stripes are also an excellent option for DIY enthusiasts, easily achieved with painter’s tape.
For added depth, consider mixing finishes such as matte and glossy to create visual interest. Using a level ensures your stripes are even, giving your mural a polished and professional appearance without much hassle.
Try these techniques to incorporate stripes into your ceiling design:
– Use vertical stripes to enhance room height
– Mix colors for a unique, personalized look
– Incorporate different finishes for added texture
– Ensure even lines with a level for a professional finish
This classic design creates a dynamic atmosphere, enriching your space with its playful yet elegant lines.
13. Artistic Textures

Texture plays a vital role in ceiling murals, offering a unique sensory experience. Explore techniques like sponging, rag rolling, or stencil work to create depth and interest. For instance, a textured mural resembling rustic wood or gentle stucco can add warmth and character to a small room. This style is particularly effective in entryways or cozy corners, creating an inviting atmosphere as soon as you enter.
Playing with light and shadow through texture enhances visual appeal, adding a dynamic aspect to a flat surface. Don’t hesitate to experiment with multiple textures; combining them can yield stunning and sophisticated results.
Implement these ideas to bring texture to your ceiling:
– Use sponging or rag rolling for depth
– Experiment with stencils for unique patterns
– Create a rustic wood or stucco effect for warmth
– Combine multiple textures for a layered look
This textured design enriches your space with warmth and visual interest, elevating the overall aesthetic with its unique qualities.
14. Personalized Canvas
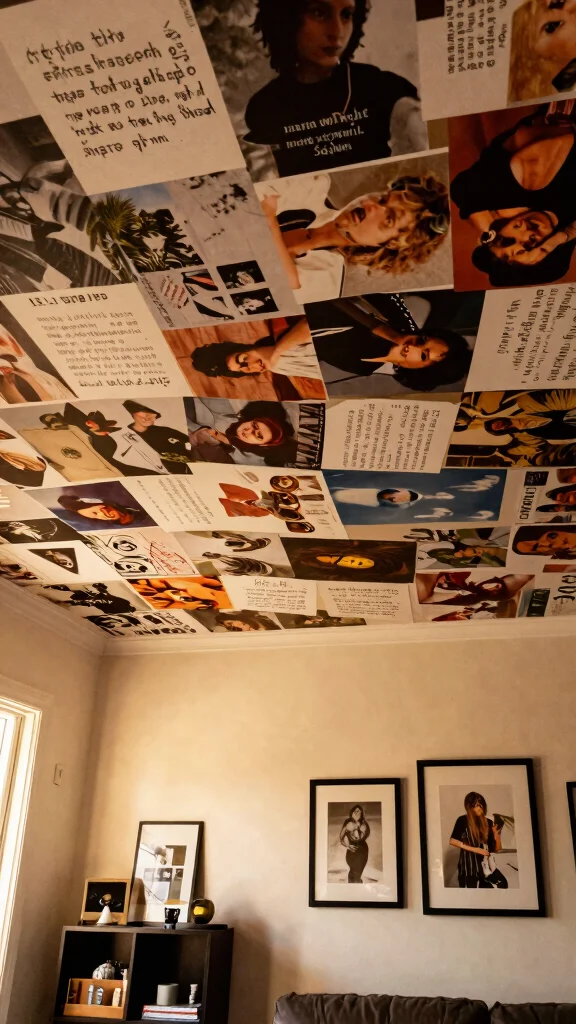
Transform your ceiling into a personalized canvas that reflects your unique style and personality. This can include beloved quotes, personal artwork, or a collage of cherished memories and images, making any space feel distinctly yours. To ensure a cohesive look, select colors and styles that harmonize with the room’s decor. Mixing different techniques, like painting and collage, can create a dynamic piece that captivates.
This mural serves as daily inspiration and a conversation starter, inviting guests to explore your creative expression. For a less permanent option, consider using removable wall decals, allowing you to change your design as your tastes evolve.
Explore these ideas to personalize your ceiling:
– Include favorite quotes for daily inspiration
– Use personal artwork for a unique touch
– Create a collage of cherished memories
– Utilize removable decals for flexibility
This personalized design enhances your space with creativity and charm, making it a true reflection of your identity.
Your ceiling can tell your story—turn it into a personalized canvas with ceiling mural ideas. Start with a favorite quote or memory collage, then pick colors that harmonize with the room. A mixed-media mural keeps the space fresh and truly yours.
Conclusion
Ceiling murals are more than just decorative elements; they’re an opportunity to express creativity and transform small spaces into unique works of art.
By implementing any of the ideas discussed, you can elevate the ambiance of your home and reflect your personal style. Whether you opt for serene skies, vibrant colors, or whimsical patterns, a painted ceiling can bring new life and joy to your surroundings. Embrace the artistic possibilities and let your imagination run free!
Note: We aim to provide accurate product links, but some may occasionally expire or become unavailable. If this happens, please search directly on Amazon for the product or a suitable alternative.
This post contains Amazon affiliate links, meaning we may earn a small commission if you purchase through our links, at no extra cost to you.
Frequently Asked Questions
What are the best ceiling mural ideas for small spaces?
Small rooms can feel bigger with ceiling mural ideas that draw the eye upward. Try 3D ceiling mural ideas like a pale sky with drifting clouds, a forest canopy, or a subtle trompe l’oeil that makes the ceiling disappear. Start with a light base color to keep the room airy.
Plan with a simple color palette and a single focal area so the design doesn’t overwhelm the space. Use a projector or grid to transfer your design, then build shading and highlights in thin layers. Finish with a matte sealer suitable for ceiling art designs to reduce glare and protect the mural.
Tip: keep furniture away from the ceiling edge to avoid reflections and use soft, indirect lighting to enhance the mural’s depth.
How do I choose a ceiling art design that fits my small room?
Define the mood and style. For artistic ceiling ideas, choose natural scenes, celestial skies, or subtle geometric patterns that complement architecture. Pick a light, cohesive color palette so walls and furniture still feel open. For tiny spaces, emphasize a single focal point and avoid busy patterns that can overwhelm. Create a quick mockup with swatches or a digital render, then test a small panel before committing to the full project.
What mural painting techniques work best for ceilings?
Ceiling painting benefits from techniques that handle overhead work. Start with a solid plan and use projection or a grid to transfer your design. Mural painting techniques like glazing for depth, sponging for texture, and dry brushing for highlights can create dimension on a ceiling. For a 3D look, apply perspective: elements near the center appear larger and recede toward edges. Always prime, use high-quality acrylics, and finish with a protective, matte topcoat.
What tools and materials do I need for a ceiling mural project?
Here’s a practical starter kit: primers and ceiling-safe paints, acrylics for details, brushes in multiple sizes, rollers, a projector or grid for easy transfer, pencils and a level, painters tape, a sturdy ladder, drop cloths, and a clear matte topcoat to seal. Don’t forget a spray bottle for misting, sponges or stencils for textures, and protective gear. This setup covers decorative ceiling murals and helps you execute ceiling mural ideas confidently.
How can I protect and maintain decorative ceiling murals long-term?
Protection starts with proper sealing and humidity control. After finishing, apply a matte varnish or ceiling-safe topcoat to guard against dust and UV fading. Clean gently with a soft cloth and avoid harsh solvents. If you’re in a humid area like a bathroom, consider a moisture barrier or dehumidifier to preserve your ceiling art designs over time. Re-seal every few years or when the finish shows wear, and touch up as needed to keep your creative ceiling decor looking fresh.
Related Topics
ceiling mural ideas
3D ceiling art
decorative ceilings
mural painting techniques
artistic ceiling decor
small space design
creative ceiling ideas
advanced techniques
DIY ceiling murals
unique home decor
trending ceiling designs
beginner friendly